 (http://xv4y NULL.radioclub NULL.asia/2012/10/18/balise-wspr-autonome-avec-msp430-le-code-source/kit-wspr-mod-balise/)
[GTranslate]
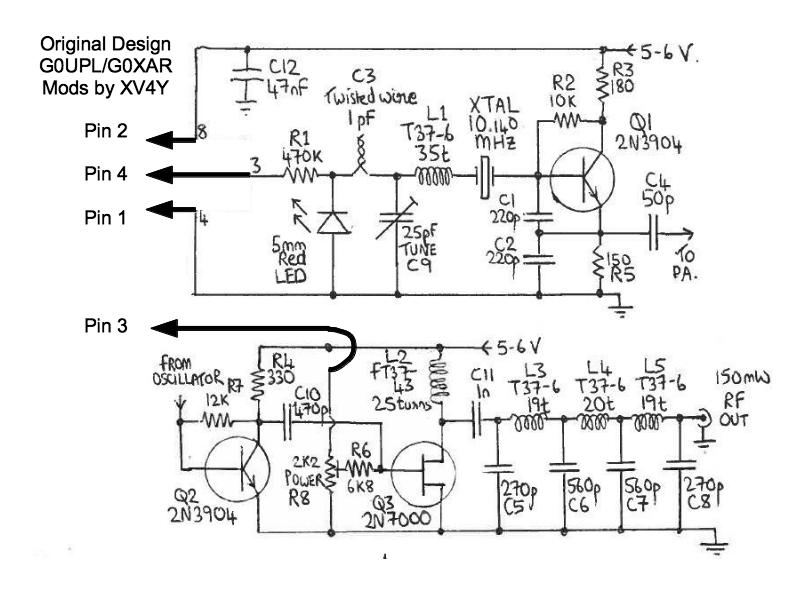
Voici le code que j’ai écrit et qui permet de modifier l‘émetteur original de QRP Labs (http://xv4y NULL.radioclub NULL.asia/2010/08/16/kit-balise-qrss/) pour en faire une balise transmettant régulièrement toutes les minutes paires. Cela est nécessaire si vous voulez que votre transmission soit “superposable” dans les captures du grabber. En effet, de plus en plus d’OM effectuent des compositages de captures sur une base de 10 minutes. En effectuant un traitement de moyenne ou d’interpolation on peut ainsi faire sortir du bruit un signal qui n’était pas visible autrement. Ce traitement est similaire à celui fait en astronomie planétaire avec Lynkeos (http://lynkeos NULL.sourceforge NULL.net/french/index NULL.html) par exemple.
Un kit préparé avec votre indicatif permettant de modifier le circuit de la balise pour fonctionne avec ce programme (ou la version WSPR) est disponible dans la boutique (http://xv4y NULL.radioclub NULL.asia/boutique/?slug=product_info NULL.php&cPath=22&products_id=30).
Ce programme se compile avec Energia (http://energia NULL.nu/) pour un LaunchPad avec MSP430G2553. Il nécessite ma librairie sRTC (http://xv4y NULL.radioclub NULL.asia/2012/12/19/bibliotheque-rtc-pour-energia-version-1-02/).
/* QRSS beacon with 10 minutes frame for MSP430G2553
 * Code for Energia 008

 * By Yannick DEVOS - XV4Y - May-October 2012
    http://xv4y.radioclub.asia/

    Copyright 2012 Yannick DEVOS under GPL 3.0 license
    Any commercial use or inclusion in a kit is subject to author approval

====
 * Ouput on 2 bits PinA and PinB
 * PTT_key output allows to turn on/off the TX PA while sending
 * Mirror on LED1 and LED2 du LaunchPad for testing
 * Output to Serial for testing
 * Using an R-2R ladder it makes the G0UPL/G0XAR beacon frequency shift

====
Revision history :
v1.00    2012-10-26
         First release
v1.01    2012-12-01
         Cleaning and commenting
v1.02    2012-12-19
         Changes to support version 1.02 of RTC library
         Correction for better time accuracy with Serial output enabled

====
This program is free software: you can redistribute it and/or modify
it under the terms of the GNU General Public License as published by
the Free Software Foundation, either version 3 of the License, or
at your option) any later version.

This program is distributed in the hope that it will be useful,
but WITHOUT ANY WARRANTY; without even the implied warranty of
MERCHANTABILITY or FITNESS FOR A PARTICULAR PURPOSE.  See the
GNU General Public License for more details.

You can download a copy of the GNU General Public License at <http://www.gnu.org/licenses/>
*/

// Here under don't touch anything unless you know what you do

#include <legacymsp430.h>
#include <sRTC.h> // Library for RTC clock with MSP430

// Alphabet binary coding by G0UPL
// 0 = dot, 1 = dash
const int _A	=	0b11111001;
const int _B	=	0b11101000;
const int _C	=	0b11101010;
const int _D	=	0b11110100;
const int _E	=	0b11111100;
const int _F	=	0b11100010;
const int _G	=	0b11110110;
const int _H	=	0b11100000;
const int _I	=	0b11111000;
const int _J	=	0b11100111;
const int _K	=	0b11110101;
const int _L	=	0b11100100;
const int _M	=	0b11111011;
const int _N	=	0b11111010;
const int _O	=	0b11110111;
const int _P	=	0b11100110;
const int _Q	=	0b11101101;
const int _R	=	0b11110010;
const int _S	=	0b11110000;
const int _T	=	0b11111101;
const int _U	=	0b11110001;
const int _V	=	0b11100001;
const int _W	=	0b11110011;
const int _X	=	0b11101001;
const int _Y	=	0b11101011;
const int _Z	=	0b11101100;
const int _SPC	=       0b11101111;
const int _0	=	0b11011111;
const int _1	=	0b11001111;
const int _2	=	0b11000111;
const int _3	=	0b11000011;
const int _4	=	0b11000001;
const int _5	=	0b11000000;
const int _6	=	0b11010000;
const int _7	=	0b11011000;
const int _8	=	0b11011100;
const int _9	=	0b11011110;
const int _BRK	 =      0b11010010;
const int _WAIT  =	0b10000000;

byte begin_sec;
int begin_chunk;

// Déclaration et initilisation des variables
byte msgIndex = 1;
byte inc_bit = 8;
byte character = _SPC;
boolean start = false;

byte key = 0;
byte etat = 0;

// *** PARAMETERS
// Here modify to your taste or needs

#define PTT_key 8
#define wsprPinA 10
#define wsprPinB 9
#define LEDPinA 14
#define LEDPinB 2
#define StartBtn 5

const int msg[] = {5, _X, _V, _4, _Y, _WAIT};  // Format, is lenght in decimal and then the character constants including the _WAIT for the end of the sequence

int vitesse = 6;    // Number of seconds per dot (QRSS6 = 6)

// Be carefull, this is only for debugging.
// If you enable this in production, the clock will drift to much (5 seconds in 10 minutes)
#define SERIAL_OUT_INFO

// This is in case you use a MSP430 that does not have Hardwart UART. TimerSerial works great but bring a lot of clock drift. Replace each "Serial" object call in the code by mySerial.
/*
#ifdef SERIAL_OUT_INFO
#include <TimerSerial.h>
TimerSerial mySerial;
#endif
*/

// *** END OF PARAMETERS

#ifdef SERIAL_OUT_INFO
#endif
RealTimeClock myClock;

//******************************************************************
// Defining pins mode
// Encoding the WSPR sequence

void setup() {
  pinMode(PTT_key, OUTPUT);
  pinMode(wsprPinA, OUTPUT);
  pinMode(wsprPinB, OUTPUT);
  pinMode(LEDPinA, OUTPUT);
  pinMode(LEDPinB, OUTPUT);
  pinMode(StartBtn, INPUT_PULLUP);

  myClock.begin();

  #ifdef SERIAL_OUT_INFO
  Serial.begin(9600);
  Serial.println("\n* MSP430 QRSS beacon");
  #endif

  digitalWrite( PTT_key, LOW );
  digitalWrite( wsprPinA, LOW );
  digitalWrite( wsprPinB, LOW );

  digitalWrite( LEDPinA, HIGH );
  digitalWrite( LEDPinB, HIGH );

  #ifdef SERIAL_OUT_INFO
  Serial.println("* Wait clock is set. Sending test sequence.");
  #endif
  begin_chunk = myClock.RTC_chunk;
  begin_sec = myClock.RTC_sec;
  while(digitalRead(StartBtn)) {
    // This is for blinking LED fast
    if ((myClock.RTC_chunk-(begin_chunk+15))%60==0)
      digitalWrite( LEDPinA, HIGH );
    if ((myClock.RTC_chunk-(begin_chunk+30))%60==0)
      digitalWrite( LEDPinB, HIGH );
    if ((myClock.RTC_chunk-(begin_chunk+45))%60==0)
      digitalWrite( LEDPinA, LOW );
    if ((myClock.RTC_chunk-(begin_chunk+60))%60==0)
      digitalWrite( LEDPinB, LOW );

    // We also send a test sequence to help calibrate the transmitter
    if ((myClock.RTC_chunk-(begin_chunk+0))%240==0)
      send_test(begin_sec);

   };
  //randomSeed(myClock.RTC_chunk);
  myClock.Set_Time(0,0,0);
};

//******************************************************************
// Here starts the actual sequence sending

void loop() {
  #ifdef SERIAL_OUT_INFO
  Serial.print("Time:");
  Serial.print(myClock.RTC_min, DEC);
  Serial.print(":");
  Serial.print(myClock.RTC_sec, DEC);
  Serial.print(".");
  Serial.println(myClock.RTC_chunk, DEC);
  #endif

  digitalWrite( PTT_key, LOW );

  digitalWrite( wsprPinB, LOW );
  digitalWrite( LEDPinB, LOW );

  digitalWrite( wsprPinA, LOW );
  digitalWrite( LEDPinA, LOW );

  begin_chunk = myClock.RTC_chunk;

  #ifdef SERIAL_OUT_INFO
  Serial.println("* Waiting 1st sec of every 2 mins.");
  #endif

  while (!(myClock.RTC_sec==1 && (myClock.RTC_min%2)==0)) {  // We start each first second of even minutes
    if ((myClock.RTC_chunk-(begin_chunk+10))%20==0) digitalWrite( LEDPinA, HIGH );
    if ((myClock.RTC_chunk-(begin_chunk+20))%20==0) digitalWrite( LEDPinA, LOW );
  };

  #ifdef SERIAL_OUT_INFO
  Serial.println("\n* Sequence begin");
  #endif
  digitalWrite( PTT_key, HIGH );
  send_sequence();
  #ifdef SERIAL_OUT_INFO
  Serial.println("\n* End");
  #endif
};

//******************************************************************
// Function to send the test sequence
void send_test(char begin_sec) {
    if ((myClock.RTC_sec-(begin_sec+0))%30==0) {
      digitalWrite( PTT_key, LOW );
      digitalWrite( wsprPinA, LOW );
      digitalWrite( wsprPinB, LOW );
      #ifdef SERIAL_OUT_INFO
      Serial.println("* TX Low, Send 00 *");
      #endif
    }

    if ((myClock.RTC_sec-(begin_sec+6))%30==0) {
      digitalWrite( PTT_key, HIGH );
      digitalWrite( wsprPinA, LOW );
      digitalWrite( wsprPinB, LOW );
      #ifdef SERIAL_OUT_INFO
      Serial.println("* TX High, Send 00 *");
      #endif
    }

    if ((myClock.RTC_sec-(begin_sec+12))%30==0) {
      digitalWrite( PTT_key, HIGH );
      digitalWrite( wsprPinA, HIGH );
      digitalWrite( wsprPinB, LOW );
      #ifdef SERIAL_OUT_INFO
      Serial.println("* TX High, Send 01 *");
      #endif
    }

    if ((myClock.RTC_sec-(begin_sec+18))%30==0) {
      digitalWrite( PTT_key, HIGH );
      digitalWrite( wsprPinA, LOW );
      digitalWrite( wsprPinB, HIGH );
      #ifdef SERIAL_OUT_INFO
      Serial.println("* TX High, Send 10 *");
      #endif
    }

    if ((myClock.RTC_sec-(begin_sec+24))%30==0) {
      digitalWrite( PTT_key, HIGH );
      digitalWrite( wsprPinA, HIGH );
      digitalWrite( wsprPinB, HIGH );
      #ifdef SERIAL_OUT_INFO
      Serial.println("* TX High, Send 11 *");
      #endif
    }

};

//******************************************************************
// Function to send the sequence
void send_sequence() {

  while (character != _WAIT) {
    msgIndex = 1;

    while (msgIndex < msg[0]+1) {
      // We read each character in the array
      character = msg[msgIndex];

      inc_bit = 8;

      // Special characters
      if (character == _SPC) {  // For inter-words spacing, we need 5 dots, since we already have 1+2, we need 2 more
         begin_sec = myClock.RTC_sec;
         #ifdef SERIAL_OUT_INFO
         Serial.println("\n* Inter word Space *");
         #endif
         while ( ((60+myClock.RTC_sec-begin_sec)%60)<(2*vitesse) ) {
            delay(0);
         };
         inc_bit = 0;
      };
      if (character == _WAIT) {  // For WAIT or end of sequence, we just skip sending
         #ifdef SERIAL_OUT_INFO
         Serial.println("\n* Enf of sequence *");
         #endif
         inc_bit = 0;
      };

      while (inc_bit) {

        // We read each bit of the character
        etat = bitRead(character,inc_bit-1);

        if (start) {
          if (etat) {
            key=3; // If the bit is 1 then it is a dash
            #ifdef SERIAL_OUT_INFO
            Serial.print("-");
            #endif
          } else {
            key=1; // If the bit is 0 then it is a dot
            #ifdef SERIAL_OUT_INFO
            Serial.print(".");
            #endif
          }

          while (key) {

            digitalWrite( wsprPinB, HIGH );
            digitalWrite( LEDPinB, HIGH );
            digitalWrite( wsprPinA, HIGH );
            digitalWrite( LEDPinA, HIGH );

            // We wait 1 second x VITESSE parameter
            begin_sec = myClock.RTC_sec;
            while ( ((60+myClock.RTC_sec-begin_sec)%60)<(1*vitesse) ) {
              delay(0);
            };

            key--;
          }

          digitalWrite( wsprPinB, LOW );
          digitalWrite( LEDPinB, LOW );
          digitalWrite( wsprPinA, LOW );
          digitalWrite( LEDPinA, LOW );
            // We wait 1 second x VITESSE parameter
          begin_sec = myClock.RTC_sec;
          while ( ((60+myClock.RTC_sec-begin_sec)%60)<(1*vitesse) ) {
            delay(0);
          };
        }

        if (!etat && !start) start=true;

        inc_bit--;

      }
      // We add one space between each characteur (lenght is 3 dots, including the one in the here above loop)
      begin_sec = myClock.RTC_sec;
      #ifdef SERIAL_OUT_INFO
      Serial.print(" ");
      #endif
      while ( ((60+myClock.RTC_sec-begin_sec)%60)<(2*vitesse) ) {
        delay(0);
      };

      start = false;
      msgIndex++;
    };
   };
   character = _SPC;
};

//******************************************************************
// Interruption for the RTC clock
interrupt(TIMER1_A0_VECTOR) Tic_Tac(void) {
  myClock.Inc_chunk();		      // Update chunks
};


 (http://dx-world NULL.net/2010/ri1anc-vostok-base-antarctica/)En plus, avec les conditions hivernales les bandes ferment toutes très tôt. Entre 14h et 16h locales (7-9:00 utc), les ouverture vers l’Europe sur 15 mètres sont excellentes, mais en ce moment je n’ai pas trop le temps. En soirée, le 20 mètres est souvent calme et malgré des tentatives répétées sur 80 mètres rien de bien glorieux n’est venu alimenter mon log.
 (http://xv4y NULL.radioclub NULL.asia/2012/12/23/le-dernier-new-one-de-lannee/ri1anc_b1/)Bien m’en a pris car sur 17 mètres une station arrivait plutôt fort (S7 avec du QSB) et ne semblait pas trop occupée mais avait toutes les caractéristiques du DX : signal avec un léger écho, échanges simples mais courtois avec un rythme bien précis, correspondants plutôt nerveux et ne s’éternisant pas… La station renvoie régulièrement son indicatif après chaque QSO donc très vite je me rends compte que c’est RI1ANC (http://www NULL.qrz NULL.com/db/RI1ANC) : la base Vostok en Antarctique! Très beau DX pour moi à plusieurs titres : tout d’abord c’est un new-one, le QSO sera confirmé par LotW et surtout symboliquement les occupants d’une base en Antarctique sont parmi les derniers pour qui la radio représente vraiment quelque chose.
 (http://xv4y
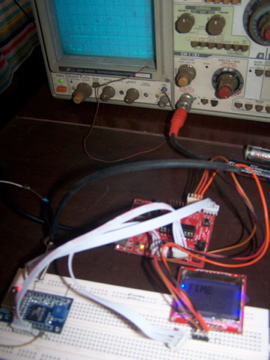
 (http://xv4y
 (http://xv4y
 (http://xv4y
 (http://xv4y
 (http://xv4y